
Best Waffle Makers for Perfect Waffles in July 2026
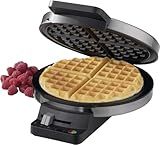
Cuisinart Waffle Maker, 1250W Round Classic Waffle Iron, 5-Setting Adjustable Browning Control, WMR-CAP2, Brushed Stainless
- PROFESSIONAL QUALITY WAFFLES AT HOME-FAST AND EASY TO MAKE!
- CUSTOM BROWNING CONTROL FOR PERSONALIZED WAFFLE PERFECTION.
- CONVENIENT UPRIGHT STORAGE; INCLUDES A 3-YEAR WARRANTY FOR PEACE OF MIND.


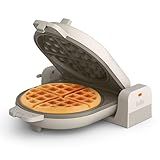
bella Flip-n-Store Waffle Maker with EverGood™ Ceramic Nonstick Coating, Fits-anywhere™ Kitchenware, Power Indicator Light, Cool Touch Handle & Cord Wrap, 7” Wide & 1" Deep Plates, 1000 Watt, Oatmilk
-
ENJOY THICK, FLUFFY DINER-STYLE WAFFLES IN MINUTES AT HOME!
-
COMPACT DESIGN SAVES 50% SPACE AND STORES EASILY IN YOUR KITCHEN!
-
HASSLE-FREE CLEANUP WITH NONSTICK COATING FOR QUICK WIPE-DOWN!
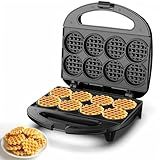
Mini Waffle Maker, Small Waffle Iron with Quick Heat-Up, Makes 8 x 2” Tiny Waffle Bites for Kids, Locking Buckle & Cool Touch Handle, Nonstick Plates, Perfect for Breakfast, Brunch, Desserts & Snacks
-
QUICK & EFFICIENT: BAKE 8 MINI WAFFLES FASTER WITH DOUBLE-SIDED PLATES!
-
USER-FRIENDLY: SIMPLE OPERATION WITH A SIGNAL LIGHT FOR PERFECT TIMING.
-
VERSATILE FUN: GREAT FOR KIDS, GATHERINGS, AND AS A THOUGHTFUL GIFT!
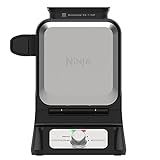
Ninja BW1001 NeverStick PRO Belgian Waffle Maker, Vertical Design, 5 Shade Settings, with Precision-Pour Cup & Chef-curated Recipe Guide, Black & Silver
-
EVEN HEATING FOR PERFECT WAFFLES EVERY TIME
-
5 SETTINGS FOR CUSTOMIZABLE TEXTURE PERFECTION
-
INCLUDES MEASURING CUP FOR HASSLE-FREE BAKING
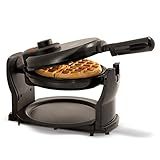
BELLA Classic Rotating Belgian Waffle Maker with Nonstick Plates, Removable Drip Tray, Adjustable Browning Control and Cool Touch Handles, Black
-
VERSATILE COOKING: MORE THAN JUST WAFFLES-PANCAKES & HASH BROWNS!
-
FAMILY-SIZED DELIGHT: MAKE LARGE BATCHES FOR FAMILY & FRIENDS QUICKLY!
-
EFFORTLESS CLEANUP: NON-STICK SURFACES & DISHWASHER-SAFE TRAY INCLUDED!
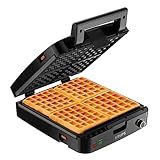
KRUPS 4-Slice Belgian Waffle Maker: Stainless Steel, 5 Browning Levels, Audible Ready Beep, Removable Plates, 1200W, Silver/Black, Large Waffle Maker Family Size, Great for Family Breakfasts
- BAKE 4 WAFFLES SIMULTANEOUSLY FOR FAMILY-FRIENDLY BREAKFAST FUN!
- CUSTOMIZE BROWNING WITH 5 LEVELS FOR PERFECT WAFFLES EVERY TIME!
- EASY CLEANUP WITH NONSTICK REMOVABLE PLATES-MORE WAFFLE TIME!
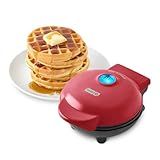
DASH Mini Waffle Maker - 4” Waffle Mold, Nonstick Waffle Iron with Quick Heat-Up, Nonstick Surface - Perfect Mini Waffle Maker for Kids and Families, Just Add Batter (Red)
-
QUICK & FUN: COOK PERFECT 4” MINI WAFFLES IN MINUTES WITH EASE!
-
SAFE & SIMPLE: BUILT-IN INDICATOR AND NON-SLIP DESIGN FOR WORRY-FREE USE.
-
VERSATILE TREATS: CREATE BREAKFAST OR SNACKS; FREEZE EXTRAS FOR LATER!
Cooking waffles in a waffle maker is a fairly simple process. Here's a step-by-step guide on how to do it:
- Preheat the waffle maker: Start by preheating your waffle maker. This is an essential step to ensure your waffles cook evenly and achieve a crispy texture.
- Prepare the batter: While the waffle maker is heating up, you can prepare your waffle batter. You can either use a pre-made mix or make your own from scratch. Follow the recipe instructions and make sure the batter is well mixed.
- Grease the waffle maker: To prevent your waffles from sticking to the waffle maker's surface, you'll need to grease it. You can use cooking spray, melted butter, or oil for this purpose. Apply a thin, even layer to both sides of the waffle maker.
- Pour the batter: Open the waffle maker and pour your batter into the center of the bottom plate. The amount of batter needed will depend on your waffle maker's size and the thickness you desire. Start with a small amount, and if necessary, adjust it accordingly for subsequent waffles.
- Close the waffle maker: Close the lid of the waffle maker and make sure it's tightly shut. The batter should spread out and fill the entire mold, so avoid overfilling, or it may overflow when closing.
- Cook the waffle: Allow the waffle to cook for the recommended amount of time or until it reaches your desired level of crispiness. Cooking times can vary, but it usually takes about 3-5 minutes. Avoid opening the waffle maker during cooking, as it may cause the waffle to break apart.
- Check for doneness: Once the cooking time has elapsed, carefully open the waffle maker to check if the waffle is done. It should be golden brown and crispy. If it appears undercooked or pale, close the waffle maker and cook it for a bit longer.
- Remove the waffle: Gently remove the cooked waffle from the waffle maker using a fork or tongs. Be cautious as the waffle will be hot. Place it on a wire rack or a plate to cool slightly while you repeat the process with the remaining batter.
- Serve and enjoy: Once all the waffles are cooked, they're ready to be served. You can top them with your favorite sauces, fruits, whipped cream, or other desired toppings. Enjoy your delicious homemade waffles!
Remember, each waffle maker may have slightly different instructions, so it's essential to refer to the manufacturer's guidelines provided with your specific model.
How to make buttermilk waffles in a waffle maker?
To make buttermilk waffles in a waffle maker, follow these steps:
Ingredients:
- 2 cups all-purpose flour
- 2 tablespoons sugar
- 1 teaspoon baking powder
- 1/2 teaspoon baking soda
- 1/2 teaspoon salt
- 2 cups buttermilk
- 2 eggs
- 1/4 cup melted butter
- Non-stick cooking spray
Instructions:
- Preheat your waffle maker according to its instructions.
- In a large bowl, whisk together the flour, sugar, baking powder, baking soda, and salt.
- In a separate bowl, beat the buttermilk, eggs, and melted butter together until well combined.
- Pour the wet ingredients into the dry ingredients and stir until just combined. Be careful not to overmix, as this can result in tough waffles.
- Lightly spray the preheated waffle maker with non-stick cooking spray.
- Spoon the waffle batter onto the center of the bottom plate of the waffle maker, spreading it slightly with the back of the spoon.
- Close the lid of the waffle maker and cook according to the manufacturer's instructions, usually about 3-5 minutes, or until the waffles are golden brown and cooked through.
- Carefully remove the buttermilk waffles from the waffle maker and repeat the process with the remaining batter.
- Serve the waffles warm with your favorite toppings such as maple syrup, fresh berries, whipped cream, or plain butter. Enjoy!
What is the golden ratio of flour to liquid in waffle batter?
The golden ratio of flour to liquid in waffle batter can vary depending on personal preferences and the desired texture of the waffles. However, a common ratio is around 1 cup of flour to 1-1.25 cups of liquid. This ratio typically results in a thick batter that yields crispy waffles with a tender interior. Adjustments can be made by adding more or less liquid to achieve the desired consistency.
How to make crispy waffles in a waffle maker?
To make crispy waffles in a waffle maker, you can follow these steps:
- Preheat the waffle maker: Make sure to preheat your waffle maker according to the manufacturer's instructions. This helps ensure even cooking and a crispier texture.
- Prepare the batter: Prepare your favorite waffle batter recipe or use a pre-made waffle mix. You can also add some extra ingredients to enhance crispiness, such as a tablespoon of cornstarch or a splash of seltzer water.
- Grease the waffle maker: Lightly brush or spray the waffle maker with cooking oil or melted butter before pouring the batter. This prevents sticking and helps achieve a crispy exterior.
- Fill the waffle maker: Pour the prepared batter onto the center of the preheated waffle maker. The amount of batter will depend on the size and capacity of your waffle maker. Be careful to not overfill, as the batter may overflow.
- Close and cook: Close the lid of the waffle maker and cook the waffles according to the specific instructions for your appliance. Generally, it takes about 3-5 minutes, but the cooking time may vary. Avoid opening the lid during the cooking process to maintain consistent heat.
- Check for doneness: Check the doneness of the waffles by gently lifting the lid. The waffles should be golden brown and crispy on the outside. If they appear pale or soft, close the lid and continue cooking for another minute or so until desired crispness is achieved.
- Remove and serve: Carefully remove the cooked waffles from the waffle maker using a fork or tongs. Place them on a wire rack, which helps preserve their crispness. If you're making multiple waffles, keep them in a single layer while cooling to prevent them from becoming soggy.
- Enjoy: Serve the crispy waffles immediately with your favorite toppings, such as maple syrup, butter, fruits, or whipped cream.
Remember, experimenting with your waffle maker settings, such as adjusting the temperature or cooking time, can help you achieve the perfect crispiness based on your preference.
How to make gluten-free waffles?
To make gluten-free waffles, you can use gluten-free alternative flours such as rice flour, almond flour, or a gluten-free flour blend. Here's a simple recipe you can try:
Ingredients:
- 1 ½ cups gluten-free flour (rice flour, almond flour, or gluten-free flour blend)
- 1 ½ tablespoons sugar
- 2 teaspoons baking powder
- ½ teaspoon salt
- 1 ¼ cups milk (or dairy-free milk alternative)
- 2 eggs
- ¼ cup melted butter (or dairy-free alternative)
- 1 teaspoon vanilla extract
Instructions:
- Preheat your waffle iron according to the manufacturer's instructions.
- In a large mixing bowl, whisk together the gluten-free flour, sugar, baking powder, and salt.
- In a separate bowl, whisk together the milk, eggs, melted butter, and vanilla extract.
- Pour the wet ingredients into the dry ingredients and whisk until well combined, ensuring there are no lumps.
- Allow the batter to sit for 5-10 minutes to allow the flours to absorb the liquid.
- Grease the preheated waffle iron with cooking spray or melted butter.
- Pour the batter onto the hot waffle iron, spreading evenly.
- Close the waffle iron and cook until golden brown and crispy (usually around 3-5 minutes, but varies depending on your waffle iron).
- Carefully remove the waffle from the iron and place it on a wire rack to keep it crispy while you cook the remaining waffles.
- Serve warm with your favorite toppings such as fresh fruit, maple syrup, or whipped cream.
Note: Always double-check the labels of your ingredients to ensure they are certified gluten-free if you have celiac disease or are highly sensitive to gluten. You can also experiment with adding flavors like cinnamon or chocolate chips to customize your gluten-free waffles.