
Best Cherry Pie Baking Essentials in July 2026
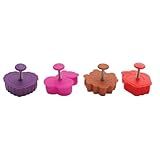
Mrs. Anderson’s Baking Pie Crust Cookie Cutters, BPA Free, Set of 4
- CREATE STUNNING PIE CRUSTS WITH EASY-TO-USE DECORATIVE CUTTERS!
- BPA-FREE, DURABLE MATERIAL ENSURES SAFE AND LONG-LASTING USE.
- PERFECT FOR COOKIES AND PASTRIES-VERSATILE FOR ALL BAKING FUN!


Goeielewe Pastry/Cookie/Fondant Stamper, 2-Inch Press Cookies Mold with 4 Stamps Pink Cherry Blossom Shape Flower Hand Pressure Pastry Tool Fondant Cutters Set for Baking
- CREATE STUNNING TREATS WITH OUR CHERRY BLOSSOM PRESS TOOL!
- EASY TO CLEAN AND PERFECT FOR ANY FESTIVE OCCASION.
- DURABLE, FOOD-GRADE MATERIAL ENSURES SAFE BAKING!
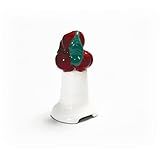
Fox Run Cherry Pie Vent, Pie Bird For Baking
- BAKE PERFECT PIES: ENSURE EVEN CRUSTS WITH STEAM-RELEASING DESIGN.
- BEAUTIFUL DESIGN: HAND-PAINTED PORCELAIN ADDS CHARM TO YOUR KITCHEN.
- OVEN SAFE: DURABLE UP TO 450°F FOR CONFIDENT BAKING EVERY TIME!
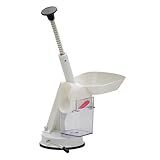
Mrs. Anderson’s Baking Deluxe Cherry Pitter with Suction Base, BPA Free, 11-Inches x 7.5-Inches x 4.5-Inches
- EFFORTLESSLY PIT CHERRIES AND OLIVES-NO BRUISING OR MESS!
- DURABLE, BPA-FREE DESIGN WITH SUCTION BASE FOR SECURE USE.
- FAST, AUTOMATIC FEED TRAY AND CATCH BIN FOR QUICK PITTING.

6 Pack Hand Pie Molds for Baking - Dough Presser Mini Pocket Pie Molds - Fall Thanksgiving Halloween Apple Pumpkin Hand Pie One Press Mold Maker
- CREATE FESTIVE MINI PIES IN 6 FUN SHAPES FOR HOLIDAY CELEBRATIONS!
- EFFORTLESSLY MOLD ADORABLE PIES WITH JUST ONE SIMPLE PRESS!
- PERFECT GIFT FOR BAKERS-SHARE HOLIDAY JOY WITH OUR PIE MOLDS!
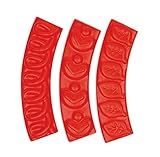
Talisman Designs Pastry Stamps | Set of 3 | Pie Crust Embosser | Pie Decorating Tools & Gadgets | Pie Baking Crust Cutters | Cute & Functional Kitchen Supplies
- CREATE PROFESSIONAL PIE CRUSTS WITH EASE AND CREATIVITY!
- IMPRESS GUESTS WITH DECORATIVE EDGES AND PEEK-A-BOO DESIGNS.
- DURABLE, EASY TO CLEAN, AND PERFECT FOR ANY BAKING OCCASION!
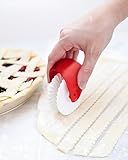
Talisman Designs Pie Crust Decorating Tools | Pastry Wheel Cutter | Set of 1
-
EFFORTLESSLY CUT PERFECT LATTICE STRIPS FOR STUNNING PASTRIES!
-
VERSATILE TOOL: GREAT FOR PASTRY, PASTA, AND FONDANT CREATIONS.
-
DISHWASHER SAFE DESIGN ENSURES EASY CLEANUP FOR MORE TIME ENJOYING.
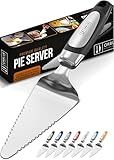
Orblue Pie Server, Essential Kitchen Tool, Serrated on Both Sides, Great for Right or Left Handed Chef, Stainless Steel Flatware, Cake Cutter, Black
- SERRATED EDGES FOR LEFT & RIGHT-HANDED USE: PERFECT FOR ALL CHEFS!
- DURABLE RUST-RESISTANT STAINLESS STEEL: BUILT FOR LONG-LASTING USE.
- ERGONOMIC HANDLE FOR COMFORT: ENJOY A SECURE GRIP WHILE SERVING.
To make a cherry pie from scratch, start by preparing a homemade pie crust. You can use a simple recipe of flour, butter, salt, and water to make the crust. Once the dough is mixed, roll it out on a floured surface and place it into a pie dish.
Next, prepare the cherry filling by rinsing and pitting fresh cherries. In a bowl, mix the cherries with sugar, cornstarch, lemon juice, and a pinch of salt. Pour the cherry filling into the pie crust and dot the top with small pieces of butter.
Top the pie with another layer of pie crust, either as a full top crust or a lattice design. Brush the crust with an egg wash for a golden finish.
Bake the cherry pie in a preheated oven until the crust is golden brown and the filling is bubbling. Allow the pie to cool before slicing and serving. Enjoy your delicious homemade cherry pie!
How do I make a decorative edge for my pie crust?
There are several ways to create a decorative edge for your pie crust. Here are a few popular methods:
- Fork Crimp: Use a fork to press down along the edge of the crust, creating a simple, yet rustic design.
- Fluted Edge: Use your fingers to crimp the edge of the crust into a wavy pattern, creating a decorative fluted edge.
- Braided Edge: Cut strips of pie dough and braid them together, then press the braided strip onto the edge of the crust.
- Cut-Out Designs: Use cookie cutters to cut shapes out of the dough and arrange them along the edge of the crust before baking.
- Lattice Edge: Cut strips of pie dough and weave them together to create a lattice pattern around the edge of the crust.
Choose a method that best fits the style of your pie and get creative with your decorative edge!
How to make a crumb topping for a cherry pie?
To make a crumb topping for a cherry pie, follow these steps:
- In a mixing bowl, combine 1 cup of all-purpose flour, 1/2 cup of granulated sugar, and a pinch of salt.
- Cut in 1/2 cup (1 stick) of cold unsalted butter using a pastry cutter or your hands until the mixture resembles coarse crumbs.
- Sprinkle the crumb topping evenly over the cherry pie filling, covering it completely.
- Bake the cherry pie according to the recipe instructions, until the topping is golden brown and the cherry filling is bubbly.
- Let the pie cool slightly before serving to allow the juices to set.
Enjoy your delicious cherry pie with a tasty crumb topping!
What is the best way to roll out pie dough?
- Start by dusting your work surface and rolling pin with a little flour to prevent sticking.
- Divide your pie dough in half and roll out one half at a time. Keep the other half in the refrigerator to keep it chilled.
- Begin rolling from the center of the dough and work outwards, rotating the dough a quarter turn after each roll to ensure it's rolled out evenly.
- Roll the dough to about 1/8 inch thickness, or to the size specified in your recipe.
- To transfer the dough to the pie dish, gently fold it in half and then in quarters. Place the point of the dough in the center of the pie dish and unfold.
- Gently press the dough into the bottom and sides of the dish, being careful not to stretch it too much.
- Trim any excess dough hanging over the edges of the dish, leaving about a 1-inch overhang to crimp the edges.
- If your recipe calls for a pre-baked crust, prick the bottom and sides of the dough with a fork and blind bake according to instructions.
- If your recipe calls for a double crust pie, add the filling to the bottom crust, then roll out the second half of the dough and place it over the filling.
- Trim and crimp the edges of the pie dough, then bake according to your recipe's instructions.
How to make mini cherry pies from scratch?
Ingredients:
- 2 cups fresh or frozen cherries, pitted and halved
- 1/2 cup sugar
- 1 tablespoon cornstarch
- 1 tablespoon lemon juice
- 1/2 teaspoon vanilla extract
- 1 package store-bought pie crust (or homemade)
- Egg wash (1 egg beaten with a splash of water)
- Additional sugar for sprinkling on top
Instructions:
- Preheat the oven to 375°F (190°C) and line a baking sheet with parchment paper.
- In a medium saucepan, combine the cherries, sugar, cornstarch, lemon juice, and vanilla extract. Cook over medium heat, stirring occasionally, until the mixture thickens, about 10 minutes. Remove from heat and let cool.
- Roll out the pie crust on a lightly floured surface and cut out circles using a cookie cutter or a glass. You will need two circles for each mini pie (one for the bottom and one for the top).
- Place half of the circles on the prepared baking sheet. Spoon the cherry mixture onto each circle, leaving a small border around the edges. Place another circle on top and crimp the edges to seal the pies.
- Brush the tops of the pies with the egg wash and sprinkle with sugar. Cut a few slits in the top crust to allow steam to escape.
- Bake in the preheated oven for 20-25 minutes, or until the crust is golden brown.
- Let the mini cherry pies cool slightly before serving. Enjoy!