
Best Pans to Bake Banana Bread In in July 2026
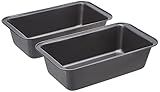
Amazon Basics Rectangular Baking Bread Loaf Pan, 9.5 x 5 Inch, Set of 2, Gray
- DURABLE STEEL FOR EVEN HEATING & PERFECT BROWNING EVERY TIME.
- NONSTICK COATING ENSURES EASY FOOD RELEASE & HASSLE-FREE CLEANUP.
- VERSATILE PANS FOR BAKING BREAD, CAKES, OR MEATLOAF-PERFECT SET!


Bakken- Swiss BAKKENMASTER Loaf Pan Set 4-Piece - Deluxe Nonstick Carbon Steel Bakeware for Perfect Bread and Cakes – Dishwasher Safe, Premium Pans for Home Baking
-
PROFESSIONAL-GRADE QUALITY ENSURES BAKERY RESULTS FOR ALL SKILL LEVELS.
-
UNMATCHED NON-STICK PERFORMANCE FOR EFFORTLESS RELEASE AND PERFECT SHAPES.
-
SPACE-SAVING, STACKABLE DESIGN KEEPS YOUR KITCHEN ORGANIZED AND CLUTTER-FREE.
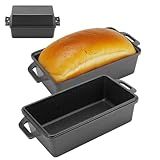
Northriver Casting 9×5 Inch Cast Iron Loaf Pan with Lid | Bread Baking Pan | Even Heat Distribution for Homemade Bread, Cake, and Meatloaf | 2 Piece Set
- VERSATILE 2-IN-1 DESIGN: USE AS LOAF PAN OR LID FOR CRISPY CRUSTS!
- HIGH-QUALITY CAST IRON: ENSURES EVEN HEAT FOR PERFECT BAKING RESULTS.
- SPACE-SAVING STORAGE: STACKABLE DESIGN KEEPS YOUR KITCHEN ORGANIZED!
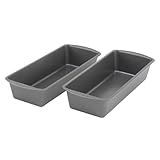
GoodCook Nonstick Loaf Pan 8 x 4-Inch Heavy-Duty Steel Bakeware with Easy-Clean Non-Stick Coating, Oven & Dishwasher Safe Pan for Meatloaf Breads Lasagnas Casseroles & More, Set of 2, Gray
- PERFECTLY BAKE MEATS, BREADS, AND DESSERTS WITH EVEN HEAT DISTRIBUTION!
- SCRATCH-RESISTANT NONSTICK COATING ENSURES MESS-FREE SERVING EVERY TIME.
- DURABLE, HEAVY-DUTY DESIGN GUARANTEES LONG-LASTING BAKING PERFORMANCE.
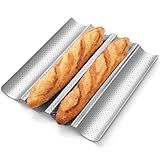
Pavsrmy Baguette Bread Pan, Premium Nonstick Perforated Baguette Pan for French Bread Baking, 4 Loaves Baguette Baking Tray for Sourdough, Italian Bread, Perfect for Creating Crisp Golden-Brown Crust
-
BAKE 4 PERFECT BAGUETTES AT ONCE-CRISPY CRUST, SOFT INSIDE!
-
NON-STICK, BPA-FREE COATING ENSURES EASY REMOVAL AND CLEANUP.
-
DURABLE CARBON STEEL WITHSTANDS HIGH TEMPS FOR EVEN BAKING.
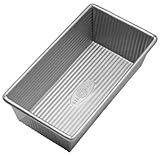
USA Pan Nonstick Standard Bread Loaf Pan, 1 Pound, Aluminized Steel
-
PERFECT FOR QUICK BREADS, POUND CAKES, AND EVEN MEAT LOAVES!
-
UNIQUE DESIGN ENSURES EVEN BAKING AND EFFORTLESS FOOD RELEASE.
-
DURABLE, USA-MADE QUALITY BACKED BY 60+ YEARS OF CRAFTSMANSHIP.

Farberware Nonstick Bakeware 9-Inch x 5-Inch Loaf Pan, Gray -
- HEAVY-GAUGE STEEL ENSURES EVEN HEATING AND LONG-LASTING DURABILITY.
- SAFE BAKING: NO HARMFUL CHEMICALS, ENSURING PEACE OF MIND.
- EASY TO HANDLE AND CLEAN, PERFECT FOR EVERYDAY BAKING NEEDS.
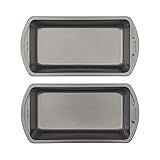
GoodCook Set of 2 Extra Large 13" x 5" Nonstick Steel Bread Loaf Pans, Gray - Set of Two Loaf Pans, Even Heat Distribution, Scratch-Resistant Nonstick Coating, Durable Construction, Easy to Clean
- BAKE PERFECT MEATLOAFS AND BREADS WITH OUR VERSATILE 2-PAN SET!
- EVEN HEAT DISTRIBUTION ENSURES DELICIOUS RESULTS EVERY TIME!
- SCRATCH-RESISTANT NONSTICK MAKES SERVING AND CLEANING A BREEZE!
When it comes to baking banana bread, there are several options for what you can bake it in. Each option can yield slightly different results, so it's worth considering which type of baking vessel you prefer. Here are some common options:
- Loaf Pan: This is the most traditional choice for baking banana bread. Loaf pans are rectangular and have relatively high sides, which help the bread rise evenly. They come in different sizes, but most recipes are designed for a standard 9x5-inch loaf pan.
- Bundt Pan: If you want a more decorative look for your banana bread, consider baking it in a bundt pan. These pans have a hole in the center, which creates a beautiful ring-shaped loaf. However, be aware that the baking time may vary compared to a regular loaf pan due to different heat distribution.
- Muffin Tin: For convenient individual servings, you can bake banana bread in a muffin tin. This option is great for portion control and easy snacking. Keep in mind that the baking time will be shorter for muffins compared to a whole loaf.
- Casserole Dish: If you don't have a loaf pan, you can still bake banana bread in a casserole dish. While it may not have the typical bread shape, it will still taste delicious. Just adjust the baking time based on the size and depth of your dish.
- Mini Loaf Pans: Similar to muffin tins, baking mini loaves is an excellent way to create individually sized portions. Mini loaf pans are typically a quarter or half the size of a standard loaf pan. This option works well for gifts or if you want to experiment with different flavors and toppings.
Remember to always grease and flour your baking vessel or use parchment paper to prevent sticking. The choice of baking pan is ultimately a matter of personal preference, and you can experiment to find your favorite method.
What is the recommended depth for a banana bread pan?
The recommended depth for a banana bread pan is typically around 2 to 3 inches. This allows the batter to spread evenly and rise properly during baking.
How to store banana bread baked in a pan?
To store banana bread baked in a pan, follow these steps:
- Allow the banana bread to cool completely before storing it. This prevents condensation and moisture inside the storage container, which could make the bread soggy.
- Wrap the loaf tightly in plastic wrap or aluminum foil to protect it from moisture and air. Make sure the entire loaf is covered.
- Place the wrapped banana bread in an airtight container or resealable plastic bag. This will further prevent any moisture from getting to the bread.
- Label the container with the date of baking or expiration, especially if you plan to freeze it for longer-term storage.
- Store the container in a cool, dry place, such as a cupboard or pantry. Make sure it is away from direct sunlight and any heat sources, which can cause spoilage.
- If you plan to store the banana bread for a longer period, you can freeze it. Place the wrapped loaf in a freezer-safe bag or container, and ensure it is tightly sealed to prevent freezer burn. Frozen banana bread can be stored for up to three months.
- When ready to consume, thaw the frozen banana bread at room temperature or reheat it in an oven or microwave.
By following these steps, your banana bread should remain fresh and delicious for several days or even weeks, depending on the storage method chosen.
How to create a caramelized crust on the top of banana bread in a pan?
To create a caramelized crust on the top of banana bread in a pan, you can follow these steps:
- Preheat your oven to the recommended temperature given in your banana bread recipe.
- Once your banana bread batter is prepared, pour it into a greased loaf pan.
- Sprinkle a generous amount of brown sugar evenly over the top of the batter. This will provide the caramelized effect and create a delicious crust.
- You can also add a sprinkle of cinnamon for extra flavor, if desired.
- Place the pan in the preheated oven and bake according to the recommended time mentioned in your recipe.
- Keep an eye on the bread towards the end of the baking time. Once the top starts to brown and the sugar has melted, you can test if the bread is done by inserting a toothpick into the center. If it comes out clean or with a few moist crumbs, it is ready.
- Remove the pan from the oven and allow the banana bread to cool in the pan for around 10 minutes.
- After the cooling time, carefully transfer the banana bread from the pan onto a wire rack to cool completely.
- The caramelized crust will become more evident as the bread cools.
Note: It’s important to pay attention to the baking time and temperature mentioned in your specific banana bread recipe, as oven temperatures may vary.
What is the importance of preheating the pan for baking banana bread?
Preheating the pan is important for baking banana bread for several reasons:
- Even baking: Preheating the pan ensures that the heat is evenly distributed throughout the bread during baking. This helps to prevent uneven cooking and ensures that the bread is cooked through evenly.
- Proper rise: When the pan is preheated, it creates a slightly higher temperature on the bottom and sides of the bread. This helps to encourage proper rising and a good texture in the final loaf.
- Crispy crust: Preheating the pan helps to create a crispy crust on the bottom and sides of the bread. This adds a desirable texture and flavor to the final product.
- Quicker baking: By preheating the pan, the banana bread will start cooking immediately upon placement in the oven. This can help to reduce the overall baking time and produce a moist and tender loaf.
Overall, preheating the pan for baking banana bread is important to ensure even baking, proper rise, a crispy crust, and a quick baking process.
How to determine the doneness of banana bread in a pan?
To determine the doneness of banana bread in a pan, follow these steps:
- Start by checking the baking time mentioned in the recipe. This will give you an approximate idea of how long the bread needs to bake.
- About 5-10 minutes before the recommended baking time is up, begin checking for doneness. Open the oven door and insert a toothpick into the center of the bread.
- If the toothpick comes out with wet batter or large crumbs sticking to it, the bread needs more time to bake. Close the oven door and continue baking for another 2-5 minutes before checking again.
- If the toothpick comes out with moist crumbs clinging to it, the bread is likely done. You want to avoid having wet batter, but some clinging crumbs are acceptable.
- If the toothpick comes out completely clean, without any crumbs or batter, the bread is overdone and might be dry. Remove it from the oven immediately.
- Another visual indicator of doneness is the golden brown color of the bread crust. If the top and sides of the bread are a deep golden brown, it is likely done. However, this method can be less accurate because some ovens may heat unevenly.
- Additionally, the bread should feel slightly firm to the touch. Gently press down on the top of the bread-if it springs back and doesn't leave an indentation, it is typically done.
Remember that baking times can vary depending on the recipe, oven, and pan size, so these guidelines are just approximate. It's always better to rely on toothpick testing and doneness indicators rather than strictly following the baking time listed in a recipe.